
- Details
- Written by: Svend Gundestrup
- Category: Linux
- Hits: 3149
I have for some time been using subversion and cvs where I work.
Since I am beginning to make by own programming project, I found it smart to have my own svn server.
Since I am online and have DMZ with a linux server, I would be able to user my archive worldwide.
Here are some of the resources I found userable:
SVN client windows:
http://subversion.tigris.org/
The official book:
http://svnbook.red-bean.com/
subversion and web_dav
http://gentoo-wiki.com/HOWTO_Apache2_with_subversion_SVN_and_DAV
Ubuntu/Debian specific:
http://www.debuntu.org/2006/05/20/54-how-to-subversion-svn-with-apache2-and-dav
Basicly I would recorment the you use the current links abow to build your svn box with.
It took be just a couple of hours, and have been working eversince
- Details
- Written by: Svend Gundestrup
- Category: Linux
- Hits: 2859
I am stil wonder about recompiling the kernel of my computer.
I found a great source here:
http://www.howtoforge.com/kernel_compilation_ubuntu
How To Compile A Kernel - The Ubuntu Way
Version 1.0
Author: Falko Timme <ft [at] falkotimme [dot] com>
Last edited 11/05/2006
Each distribution has some specific tools to build a custom kernel from the sources. This article is about compiling a kernel on Ubuntu systems. It describes how to build a custom kernel using the latest unmodified kernel sources from www.kernel.org (vanilla kernel) so that you are independent from the kernels supplied by your distribution. It also shows how to patch the kernel sources if you need features that are not in there.
I have tested this on Ubuntu 6.10 Server ("Edgy Eft") and Ubuntu 6.06 Desktop ("Dapper Drake").
I want to say first that this is not the only way of setting up such a system. There are many ways of achieving this goal but this is the way I take. I do not issue any guarantee that this will work for you!
1 Preliminary Note
I prefer to do all the steps here as the root user. So if you haven't already created a root login, you should do so now:
sudo passwd root
Afterwards, log in as root:
su
If you would like to work as a normal user instead of root, remember to put sudo in front of all the commands shown in this tutorial. So when I run
apt-get update
you should run
sudo apt-get update
instead, etc.
1.1 /bin/sh on Ubuntu 6.10 ("Edgy Eft")
On Ubuntu 6.10, /bin/sh is a symlink to /bin/dash by default. /bin/dash seems to make problems when you compile software from the sources, at least I had that impression. That's why I make /bin/sh a symlink to /bin/bash instead.
If you are on Ubuntu 6.10, you should do this now:
rm -f /bin/sh
ln -s /bin/bash /bin/sh
2 Install Required Packages For Kernel Compilation
First we update our package database:
apt-get update
Then we install all needed packages like this:
apt-get install kernel-package libncurses5-dev fakeroot wget bzip2
3 Download The Kernel Sources
Next we download our desired kernel to /usr/src. Go to www.kernel.org and select the kernel you want to install, e.g. linux-2.6.18.1.tar.bz2 (you can find all 2.6 kernels here: http://www.kernel.org/pub/linux/kernel/v2.6/). Then you can download it to /usr/src like this:
cd /usr/src
wget http://www.kernel.org/pub/linux/kernel/v2.6/linux-2.6.18.1.tar.bz2
Then we unpack the kernel sources and create a symlink linux to the kernel sources directory:
tar xjf linux-2.6.18.1.tar.bz2
ln -s linux-2.6.18.1 linux
cd /usr/src/linux
4 Apply Patches To The Kernel Sources (Optional)
Sometimes you need drivers for hardware that isn't supported by the new kernel by default, or you need support for virtualization techniques or some other bleeding-edge technology that hasn't made it to the kernel yet. In all these cases you have to patch the kernel sources (provided there is a patch available...).
Now let's assume you have downloaded the needed patch (I call it patch.bz2 in this example) to /usr/src. This is how you apply it to your kernel sources (you must still be in the /usr/src/linux directory):
bzip2 -dc /usr/src/patch.bz2 | patch -p1 --dry-run
bzip2 -dc /usr/src/patch.bz2 | patch -p1
The first command is just a test, it does nothing to your sources. If it doesn't show errors, you can run the second command which actually applies the patch. Don't do it if the first command shows errors!
You can also apply kernel prepatches to your kernel sources. For example, if you need a feature that is available only in kernel 2.6.19-rc4, but the full sources haven't been released yet for this kernel. Instead, a patch-2.6.19-rc4.bz2 is available. You can apply that patch to the 2.6.18 kernel sources, but not to kernel 2.6.18.1 or 2.6.18.2, etc. This is explained on http://kernel.org/patchtypes/pre.html:
Prepatches are the equivalent to alpha releases for Linux; they live in the testing directories in the archives. They should be applied using the patch(1) utility to the source code of the previous full release with a 3-part version number (for example, the 2.6.12-rc4 prepatch should be applied to the 2.6.11 kernel sources, not, for example, 2.6.11.10.)
So if you want to compile a 2.6.19-rc4 kernel, you must download the 2.6.18 kernel sources (http://www.kernel.org/pub/linux/kernel/v2.6/linux-2.6.18.tar.bz2) in step 3 instead of kernel 2.6.18.1!
This is how you apply the 2.6.19-rc4 patch to kernel 2.6.18:
cd /usr/src
wget http://www.kernel.org/pub/linux/kernel/v2.6/testing/patch-2.6.19-rc4.bz2
cd /usr/src/linux
bzip2 -dc /usr/src/patch-2.6.19-rc4.bz2 | patch -p1 --dry-run
bzip2 -dc /usr/src/patch-2.6.19-rc4.bz2 | patch -p1
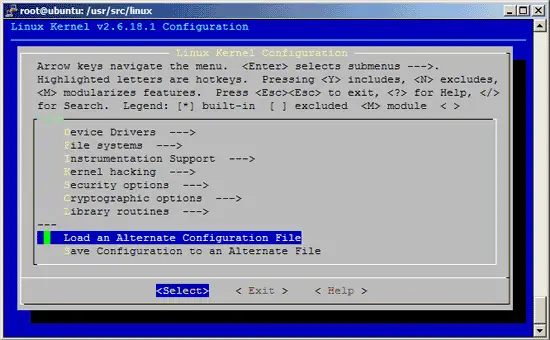
5 Configure The Kernel
It's a good idea to use the configuration of your current working kernel as a basis for your new kernel. Therefore we copy the existing configuration to /usr/src/linux:
cp /boot/config-`uname -r` ./.config
Then we run
make menuconfig
which brings up the kernel configuration menu. Go to Load an Alternate Configuration File and choose .config (which contains the configuration of your current working kernel) as the configuration file:

Then browse through the kernel configuration menu and make your choices. When you are finished and select Exit, answer the following question (Do you wish to save your new kernel configuration?) with Yes:

6 Build The Kernel
To build the kernel, execute these two commands:
make-kpkg clean
fakeroot make-kpkg --initrd --append-to-version=-custom kernel_image kernel_headers
After --append-to-version= you can write any string that helps you identify the kernel, but it must begin with a minus (-) and must not contain whitespace.
Now be patient, the kernel compilation can take some hours, depending on your kernel configuration and your processor speed.
7 Install The New Kernel
After the successful kernel build, you can find two .deb packages in the /usr/src directory.
cd /usr/src
ls -l
On my test system they were called linux-image-2.6.18.1-custom_2.6.18.1-custom-10.00.Custom_i386.deb (which contains the actual kernel) and linux-headers-2.6.18.1-custom_2.6.18.1-custom-10.00.Custom_i386.deb (which contains files needed if you want to compile additional kernel modules later on). I install them like this:
dpkg -i linux-image-2.6.18.1-custom_2.6.18.1-custom-10.00.Custom_i386.deb
dpkg -i linux-headers-2.6.18.1-custom_2.6.18.1-custom-10.00.Custom_i386.deb
(You can now even transfer the two .deb files to other Ubuntu systems and install them there exactly the same way, which means you don't have to compile the kernel there again.)
That's it. You can check /boot/grub/menu.lst now, you should find two stanzas for your new kernel there:
vi /boot/grub/menu.lst
The stanzas that were added on my test system look like these:
title Ubuntu, kernel 2.6.18.1-custom |
Now reboot the system:
shutdown -r now
If everything goes well, it should come up with the new kernel. You can check if it's really using your new kernel by running
uname -r
This should display something like
2.6.18.1-custom
If the system doesn't start, restart it, and when you see this:

press ESC to enter the GRUB menu:

Select your old kernel and start the system. You can now try again to compile a working kernel. Don't forget to remove the two stanzas of the not-working kernel from /boot/grub/menu.lst.
8 Links
- Ubuntu: http://www.ubuntu.com
- The Linux Kernel Archives: http://www.kernel.org
- Details
- Written by: Svend Gundestrup
- Category: Linux
- Hits: 3174
Dear All
I have been having some problems with my server since I upgraded fra dapper to edgyeft.
I found some of the solutions to my problems here:
Source: http://www.debianadmin.com/ubuntu-edgy-upgrade-common-problems-with-solutions.html
Ubuntu Edgy Upgrade Common Problems With solutions
We have already discussed how to upgrade ubuntu dapper to edgyeft and some people are complaing after upgrade they had problems related to x server and update problems.I have collected some of the common problems and their solutions from ubuntu forums.
I hope this collection will help for some users to fix their upgrade problems.
After upgrading if you see the following error
Booting ‘ubuntu, kernel 2.5.17-10-386′
root(hd0,0)
Filesystem type unkown, partition type 0×7
kernel /boot/vmlinuz-2.6.17-10-386 root=/dev/evmu/sda3 ro quiet splash
Error 17: Cannot mount selected partition
Solution
To fix that, press ‘e’ to enter Edit mode at the time of booting your grub bootloader, and then press ‘e’ on the first line
(the (hd0,0) one) to edit that. Change the last 0 to a 2, so it reads: (hd0,2). Then, press ‘b’ to boot.It’s assuming that
Ubuntu is installed on the very first partition, and sets the root to that… (hd0,0) means the first partition of the first
drive, and (hd0,2) means the third partition.
X Server Error for Nvidia and ATI errors
x.org log file, typically found in /var/log/Xorg.0.log, may turn up error messages such as:
(II) Primary Device is: PCI 01:00:0
(II) ATI: Candidate “Device” section “ATI Technologies, Inc. R480 [Radeon X850$]
(WW) ATI: PCI Mach64 in slot 1:0:0 could not be detected!
(WW) ATI: PCI Mach64 in slot 1:0:1 could not be detected!
(EE) No devices detected.
Fatal server error:
no screens found
Solution
sudo apt-get install xserver-xorg-video-ati
Xserver-xorg not installed after Dapper to Edgy upgrade
After upgrading when you restart the computer your X server not coming back up after reboot
Solution
Run the following command to reinstall xserver
sudo apt-get install xserver-xorg
or
sudo apt-get install –reinstall xserver-xorg
and then restart your machine using the following command
sudo shutdown -r now
Reboot the system, after which only a command prompt appears, and X does not load after typing startx or startkde at the commandline, or rebooting
Solution
From command prompt, run the command
apt-get install ubuntu-desktop
perl locale warnings upgrading to Edgy
the upgrade process is throwing up an awful lot of the errors below:
perl: warning: Please check that your locale settings:
LANGUAGE = “en_GB:en”,
LC_ALL = (unset),
LANG = “en_GB.UTF-8″
are supported and installed on your system.
perl: warning: Falling back to the standard locale (”C”).
Solution
Most of the people found that they was no effect with this error. Perl warnings didn’t seem to trigger a reaction.
text and splash doesn’t after upgrade to edgy
Solution
Open your GRUB configuration file using the following command
sudo gedit /boot/grub/menu.lst
and try to change the values recommended here
no text status messages in ubuntu edgy 6.10 splash screen
After upgrading from ubuntu 6.06 to ubuntu 6.10, usplash stopped working, Ubuntu started displaying a blank screen during startup and shutdown.
Solution
Edgy disabled the status messages in Usplash, but you can get them back easily using the following commands. First, open your menu.lst
gksudo gedit /boot/grub/menu.lst
Now you remove any mention of “quiet” from the file. You should get the messages again next time you boot.
upgrade from dapper to edgy broken 3d acceleration
When you run glxgears you get under 300 (It used to average about 1500 before) fps proceeded by the message
Xlib: extension “XFree86-DRI” missing on display “:0.0″.
Solution
Open your xorg.conf file add the following lines and save the file
Section “Extensions”
Option “Composite” “Disable”
EndSection
Generic kernel don’t boot
generic kernel failed to boot by booting my i386 kernel and type
Solution
Run the following commands
sudo mkinitramfs -o /boot/initrd.img-2.6.17-10-generic 2.6.17-10-generic
sudo update-grub
sudo aptitude reinstall linux-restricted-modules-2.6.17-10-generic
Flash plugin causes firefox crash
Flash caused Firefox to crash on new Edgy install
Solution
Open the /etc/firefox/firefoxrc file
sudo /etc/firefox/firefoxrc
add the following line and save the file
export XLIB_SKIP_ARGB_VISUALS=1
or
Comment out the composite section in x.org
or
Change your color depth to 24 bit, if you haven’t already
ATI Driver didn’t upgrade Dapper to Edgy
If you are getting following error
(EE) module ABI major version (0) doesn’t match server’s version (1)
Solution
First you need to remove the ATI drivers using the following command
sudo apt-get remove xserver-xorg-driver-ati
Install ATI Drivers using the following command
sudo apt-get install xserver-xorg-video-ati
Upgrade Dapper to Edgy nvidia GLX problem
After the upgrade OpenGL apps stopped working, nvidia-settings says The OpenGL extension ‘GLX’ is not supported by the X server or there was a problem retrieving GLX information from the X server.
Solution
sudo vi /etc/X11/xorg.conf
go to the end of the file and add this
Section “Extensions”
Option “Composite” “Disable” EndSection
then save the file and exit
Now you need to reboot using the following command
sudo reboot
Ubuntu Dapper to edgy update error
If you try to run the update manager if you receive following error
gksudo update-manager
warnings.warn(”apt API not stable yet”, FutureWarning)
/usr/lib/python2.4/site-packages/UpdateManager/MetaRelease.py:171: DeprecationWarning: Class MetaRelease is already
GObject-registered; Please note that classes containing any of the attributes __gtype_name__, __gproperties__, or __gsignals__ are now automatically registered.
gobject.type_register(MetaRelease) extracting ‘/tmp/tmpw5fQ_q/dapper.tar.gz’
authenticate ‘/tmp/tmpw5fQ_q/dapper.tar.gz’ against ‘/tmp/tmpw5fQ_q/dapper.tar.gz.gpg’
/usr/lib/python2.4/site-packages/apt/__init__.py:17: FutureWarning: apt API not stable yet warnings.warn(”apt API not stable yet”, FutureWarning) can’t find DistUpgrade ViewGtk
Solution
Install this python component
apt-get install python-vte
Update Kubuntu Dapper to Edgy: Touchpad stopped working properly
Dapper to Edgy, but after login I’m not able to use my touchpad properly anymore.
Sometimes the mouse moves right and sometimes it doesn’t move at all.
Solution
Install ati drivers
apt-get install xserver-xorg-video-ati
Gnomesword libsword5c2a dependency error
gnomesword Depends: libsword5c2a (>=1.5.8-7) but it is not installable
Solution
Install libsword5c2a version 1.5.8-8+bg2 from here
If You came across any other problems when you upgrade ubuntu edgy you can post here with your error messages and their solutions.
- Details
- Written by: Svend Gundestrup
- Category: Linux
- Hits: 6520
Dear All
I have been granted a free licence to jira, bug reporting tool, due to mednote.dk
I have had a lot of problems with installing jira, as a service on Tomcat 5.5.
Atlassian, creator of jira, does provide a standalone version, that works, but is difficult to work with, and extend to use mysql or install other tomcat services.
I have solved the problems I had, and now jira is running on my server as a service under tomcat 55.
Click readmore for my guide.
- Details
- Written by: Svend Gundestrup
- Category: Linux
- Hits: 4665